Showing posts with label Hello Kitty. Show all posts

Saturday, October 1, 2011

PB stew & cookies too ='.'=

October 1st, Saturday, what a great day to hang out with Irenie (she's always super busy & rarely has time to herself, so this is a rare occasion). I've known her since our pre-nursing Junior College days. Lately, she's been craving peanut butter... protein... I suppose. She apparently doesn't eat a lot of meat & maybe her body & baby bump is telling her to eat more PROTEIN. So today, we are making Kare-Kare (oxtail peanut butter stew- a traditional Filipino dish) & since the pressure cooker wasn't working well it took about 2 hours to tenderize the meat VS 30 minutes, so we decided to kill some time and bake PB cookies for dessert.


Both Recipes are as follows:

Kare-Kare

Peanut Butter Cookies, some with Chocolate Chips, some plain-> HK ='.'=


Kare-Kare (adapted from my SIL, Marianne's recipe)

INGREDIENTS


MEAT:
3-4 pounds of oxtail (you can also add tripe & cubes of beef stew meat if you wish)

VEGETABLES (wash these first):
1 large Chinese eggplant cut in small pieces
1 bunch of pechay or baby bok choy or 1/2 head of cabbage (we only used cabbage since her baby daddy only likes cabbage)1 bunch of sitaw
(string beans)


OTHER INGREDIENTS :
2 cups peanut butter (we used 50/50 mix of Lily's Brand & Skippy -Creamy) 
Lily's is sweet, so if you'd rather have more savory than sweet you can use the regular PB
2 packets of Mama Sita's Kare-Kare mix
3 tablespoons cooking oil
1 cup of cold water (plus more as needed)
Patis (fish sauce as needed to taste) OR salt to taste
Knorr beef bouillon cube (dissolved in the reserved stock)
2 tablespoons minced garlic
1 large onion, minced

EAT WITH:
Steamed White Rice
Bagoong (shrimp paste- my favorite is Barrio Fiesta Brand, FYI I am allergic to crustaceans, so I take my chances with just a little bit when I eat kare-kare, it is not the same without it).


EQUIPMENTS:
Large wok or skillet
Pressure cooker or a heavy large pot/sauce pan
Medium mixing bowl

2 Wooden spoons


PROCEDURES:
Wash the oxtails & place in a pressure cooker/heavy saucepan with enough water to cover (add the garlic & onions). When using a pressure cooker, once the steam indicator pops up, cook for about 30 minutes (tender meat that falls off the bone is preferred). If using a regular sauce pan/pot simmer/boil for about 2-3 hours add more water if needed. Once tender and the meat has softened, remove pot from heat and set aside (do not discard the stock).


In the wok heat the cooking oil & stir fry the vegetables. Make sure they are tender before adding the meat (without the stock), continue stirring.

In the mixing bowl, prepare the kare-kare mix by adding the 1 cup water, then add 1/2 cup of stock, mix well. Pour this mixture into the veggie-meat combo and continue to cook for about 10 minutes.

Using the same bowl add the rest of the stock, beef bouillon cube & peanut butter, mix well. Pour this mixture into the veggie-meat-sauce combo. Stir to blend well. Cook for about 5-10 minutes until the sauce thickens. 

Add the fish sauce to taste (this serves as the salty seasoning). Serve hot with bagoong & steamed white rice.


Note: while tenderizing the meat either in the pressure cooker or pot you can add some cloves of garlic & onions OR before pressure cooking the meat, you can sauté it with the garlic/onions/patis for more deliciousness.


AND FOR DESSERT

Peanut Butter Cookies

INGREDIENTS:


  • 1/2 cup creamy peanut butter (We used Skippy)
  • 1/2 cup unsalted butter
  • 3/4 cup granulated sugar
  • 3/4 cup packed brown sugar
  • 1/4 tsp salt
  • 1 tsp baking soda
  • 1 egg
  • 2 1/4 cups all purpose flour
  • Some Hershey's milk chocolate chips (will need about 5-7 chips to top each cookie)


DIRECTIONS:

  1. Preheat oven to 350 degrees F. Line cookie sheets with Silpat. Or you can grease your cookie sheets.
  2. In a medium bowl, cream together the egg, butter, peanut butter, & both sugars until smooth.
  3. In a separate bowl sift together all the dry ingredients. Using a small ice cream scoop or roll into walnut sized balls and place 2 inches apart onto the prepared cookie sheets. Flatten slightly with the tines of a fork. If you wish you can place about 5-7 chocolate chips on the top of each flattened cookie.
  4. Bake for 10 to 12 minutes in the preheated oven. If you are not using a Silpat you can use a spatula to gently lift & nudge the cookies to prevent them from sticking to the cookie sheets. Allow cookies to cool on baking sheet for 5 minutes before devouring.

Hope you enjoy the savory & sweet sides of good old peanut butter, I know we did & Irene's baby was happy too.   ='.'=


Monday, September 19, 2011

Tutorial Chocolate French Macarons ='.'=

It's Monday Morning & this is a pictutorial (picture tutorial) for Chocolate Macarons. NOTE:  If you are using regular cocoa powder & not Bellagio Chocolate then you need to change the 1 tablespoon to 3 tablespoons of cocoa & use only 1/2 a cup of Almond Flour.

Ingredients:

Kitchen Tools: AND also need a stand or hand mixer (make sure all are grease free & clean)


PROCEDURE:


Time to PREHEAT THE OVEN to 375 Degrees Fahrenheit


Tap baking sheet to release trapped air bubbles.
LET THIS SIT FOR AT LEAST 15 MINUTES 
in room temp. or Until the tops are dry & have formed a skin.
Reduce the oven temp. to 325 & bake 1 sheet at a time for about 10 to 14 minutes, rotating halfway through. 
The tops of the cookies should resemble an "egg shell" quality. The macarons should be crisp and firm. Let it sit to cool about 2-3 minutes before removing.  
Make sure to increase the temp. to 375 to preheat & repeat the baking process for the rest of the macarons.


Sandwich 2 same size macaron with about 1 tsp. filling: Peanut butter, Nutella, Chocolate Butter Cream, Dobrova, or whatever you are craving.


As always, I just can't leave a plain 'ol Macaron alone... ALOHA KITTY!!! She's tanned & wearing a flower instead of a bow.  ='.'=


This post is dedicated to my dear friend, Ate CeCe, she loves Hello Kitty & one day she will get to taste one of my chocolate HK creations. 


Without Christ I am nothing. 

Saturday, September 17, 2011

Easy Parisian FRENCH Macarons ='.'=

It's Friday- finally! How has everyone been? I missed you!

Let's bake some YUMMMMY French Macarons, but first, you should read what it is by clicking the link Definition of Macaron or check out the pictures after the recipe.

I tried baking chocolate macarons in 2008, they were yummy but not pretty (I don't want to scare you away so you'll have to read this first before you see those photos).

& if it weren't for my pastry guru, Ate Rianne AKA ArtOfDessert

I would be missing out. She bought me my very first box of rainbow delights from  Opera Patisserie San Diego. 

It was love at first bite. Ever since then I've been hooked and have been Internet studying on how to bake it. Imagine!!! I was able to transform Almond flour, egg whites, & sugar into confectionery bliss. WARNING! Learning how to bake these bite sized confectioneries is very BAD, gluttony I'd say, because, instead of enjoying just one, you might just eat them all & not want to share with anyone. So also add greed to one of those sins you have or will commit, not to mention vanity, since they are so very pretty- LOL.
Anyways, this time around I used Martha Stewart's recipe & tinted the basic batter pink (so cute) & added strawberry extract. There are other recipes that call for boiling sugar syrup and or letting them sit for 2 hours. Who has the time??? Now go shopping & start baking.

From Martha Stewart's Recipes:

Ingredients

  • For the Macarons

    • 1 cup confectioners' sugar
    • 3/4 cup almond flour
    • 2 large egg whites, room temperature
    • Pinch of cream of tartar
    • 1/4 cup superfine sugar
Directions
  1. Pulse confectioners' sugar and almond flour in a food processor until combined. Sift mixture 2 times.
  2. Preheat oven to 375 degrees. Whisk whites with a mixer on medium speed until foamy. Add cream of tartar, and whisk until soft peaks form. Reduce speed to low, then add superfine sugar. Increase speed to high, and whisk until stiff peaks form, about 8 minutes. Sift flour mixture over whites, and fold until mixture is smooth and shiny.
  3. Transfer batter to a pastry bag fitted with a 1/2-inch plain round tip, and pipe 3/4-inch rounds 1 inch apart on parchment-lined baking sheets, dragging pastry tip to the side of rounds rather than forming peaks. Tap bottom of each sheet on work surface to release trapped air. Let stand at room temperature for 15 minutes. Reduce oven temperature to 325 degrees. Bake 1 sheet at a time, rotating halfway through, until macarons are crisp and firm, about 10 minutes. After each batch, increase oven temperature to 375 degrees, heat for 5 minutes, then reduce to 325 degrees.
  4. Let macarons cool on sheets for 2 to 3 minutes, then transfer to a wire rack. (If macarons stick, spray water underneath parchment on hot sheet. The steam will help release macarons.)
  5. Sandwich 2 same-size macarons with 1 teaspoon filling. Serve immediately, or stack between layers of parchment, wrap in plastic, and freeze for up to 3 months.


  • Suggested Fillings for Macarons


  • My very first attempt... I'm not a very patient person, and although I wanted them to be perfectly round, I did not know how to use a piping bag very well. Over time, I was able to acquire some decorating skills & can now properly handle piping bags & learned a few tricks along the way.


    Baked these Strawberry ones on 09/13/11, the Strawberry preserves was great but too sweet for me & they oozed out of the macarons & made your hands pretty sticky.


    Then I couldn't stop baking them... so for 3 days straight... I made some more... so many that I think my teeth hurts just by looking at them.


    Flavors from top to bottom & left to right:
    Buko-taro, Taro-taro, Bellagio chocolate-chocolate, Mango-mango, & Lychee-mango
    I will continue to experiment with flavors and hopefully the little feet will form on those buns. Just like this batch:


    & of course I couldn't resist... so I made Hello Kitty ones too <3


    ALOHA KITTY (Bellagio Chocolate & Dobrova)
                                       Click & learn: Easy Chocolate Macarons

    Photo credit: Rianne (Art Of Dessert)

     
    & since my SIL, Annalou's birthday is on Sept. 18th, I decided to spruce up her cakes with them.


    I will try to post a video, as soon as I learn how to do that. :D Have a great & safe weekend!  Good MorNight!

    Saturday, September 10, 2011

    Rachel's Angry Birds ='.'=

    Good MorNight!

    My God-daughter, Miss Rachel turned 16 this August & I have not seen her like since forever. & I heard she would be in town for her surprise birthday party.

    So I asked her mom what kinds of things would she like for her birthday. Whoo-hoo! As fate would have it, she has not ordered a cake yet. Although I've been very busy with "life", how could I resist this privilege. I've been MIA with most of my GD's life that I am super honored to bake & create something for her. According to the mom (Ate Rhizza) & her auntie (Ate Cyndi), Rachel doesn't like pink or Sanrio characters & that her favorite color is blue & loves chocolate. WHAT!?! So I pondered for a while and remembered that she "liked" my Angry Bird sugar cookies that I posted on FB. I decided to make her what I thought would be a great idea. Create a Rachel bird & use that for the cake.


    When I had asked the hubby, what he thought of the sketch, he thought it looked great, but I wasn't happy with it at all. So I just started to play with fondant. & the 1st cake looked like this:


    Then when I placed it in the fridge, the fondant & whipped cream frosting got ANGRY with one another & it bled&pooled&uglied together. The Rachel bird- didn't look angry at all, she looked scared & almost timid.


    So the following day, I woke up super early to bake another cake. But first, here is a picture of the many pigs, that hubby requested I make.


    & the final cake. It wouldn't be complete without Hello Kitty & a Pink Balloon to show my God-Daughter that HK/Sanrio & Pink is super cute, & I love to incorporate that into almost everything I make.


    I know, I didn't learn my lesson with this cake, as you will see in the following pictures (Re: the fondant & whipped cream frosting combo).  So, I waited till the very last minute to put on the fondant deco, before delivering the cake in hopes that it could survive the party.


    Not only did the fondant melt, but apparently the cake shifted in the box too.  :C


    See that GORGEOUS smile!!!


    Mission accomplished, my GD loved it! ==> My heart is super happy! :D

     & again I say Good MorNight!  ='.'=


    Wednesday, September 7, 2011

    Dre's CUPCAKE cake ='.'=

    Happy Hump Day! & Happy Birthday to my husband of many years.

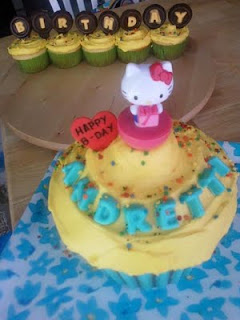
    If you live in San Diego (TODAY), then you know that the past few days were HOT & humid, rainy, sunny, cloudy, & just weird. The last post asked for cake ideas for Dre's next cake. NO ONE RESPONDED (that's cool), but I've been so busy the past few days that I used Wilton's Giant Cupcake Pan for Dre's cake. I asked him if he wanted anything special this year, but he didn't even care for cake. He just wanted it to be a day where he could do anything he wanted. So... last night I baked the cake and cupcakes so I could decorate it this morning. But since it was his birthday, I was able to sneak in a bit of baking & decorating while he slept in. In between dropping of my son & combination of being groggy/tired, I decorated the cake like this:


    The candy letter picks started to soften and melt. So I added tooth picks to hold them up and looked at the cake and thought maybe add some sprinkles:


    It needed something more, but I didn't have extra time to make additional edible decorations because we had a reservation at Lucha Libre's Champions' Booth for lunch @ eleven am. So then:


    After a few more minutes the letters "HAPPY" started to break off and fall into the cake so then:


    I removed the "HAPPY" and found a fondant heart and wrote "Happy B-Day" using Americolor gourmet color in black. But when we got back from lunch, the "BIRTHDAY" also fell apart and was too soft to manage, so then:


    I decided to scrape all the frosting from the cupcakes and whip it with the candy melt letters to make the chocolate frosting instead. & My HK wobble toy slid off because the frostng ontop was too slippery & could not support the toy any longer. So I just made a blue HK candy melt topper instead. I also added Wilton candy pearls in SD Charger colors to match the cake.

    We did so much running around today that we did not even sing, take pics with, and cut the cake. Peer into a few of the things we ate today:


    I would like to say Happy Birthday to: my love, Andretti; Regina (Ayden's Ninang); Benedict (Ayden's Ninong) & Benjamin (Ayden's Tito). BTW, sign up for Benihana's Birthday Special, they send you an e-mail and you save THIRTY bones near/on/around your birthday. Good night & God bless us all. ='.'=