Friday, November 4, 2011

Ayden's Favorite "Sprinkles" Strawberry Cupcakes Recipe ='.'=

Wow! Has it been that long since my last blog? I've been a bit stressed out lately, acutally. Why? My favorite son's 7th birthday is on Veteran's Day & I have been preparing for it all this time- eeeps. I only have 7 more days. PANIC TIME!


Since this is the month that God has blessed me with my one and only SONshine, Ayden Matthew, I think that it would be appropriate to share Ayden's favorite fruit and/or flavor cupcake. I know, I know spring and summer is over and finding fresh, red-juicy strawberries are tasking, and their scarcity makes them expensive if you ever do find them. But with this recipe, you too are blessed, because you can use fresh or frozen strawberries. If you can puree it then you can make these. Maybe, I should try other fruits and see how they turn out. Mango? Avocado? Hmmmm...


Ayden's Favorite "Sprinkles" Strawberry Cupcakes

Makes 12 cupcakes (adapted from Sprinkles recipe)
FOR THE CUPCAKE:
Ingredients (everything must be ROOM temperature)

  • 1/3 cup strawberry puree (fresh or thawed frozen)
  • 1 1/2 cups all-purpose flour  (SIFT first before measuring)
  • 6 teaspoons All Whites Liquid Egg Whites
  • 1 large egg
  • 1 cup confectioner's sugar
  • 1 tsp vanilla
  • 1 1/2 tsp. baking powder
  • 1/4 tsp. coarse salt
  • 3 tbsp. milk
  • 1 tbsp. sour cream or plain yogurt
  • 1 tsp. pure vanilla extract
  • 1/4 cup unsalted butter
  • 1/4 cup vegetable oil
Preheat oven to 350. Line 12 cup muffin tin with cupcake liners.

In a large bowl, using an electric mixer (medium-high speed) cream butter, oil, & confectioner's sugar, then slowly add all the eggs until light & fluffy. In a small bowl, mix together the milk, sour cream, salt, vanilla, & puree; set aside. Then in another bowl, sift together the flour and baking powder; set aside.

With the mixer on low setting, alternately add the flour mixture & milk mixture until well blended; scraping down sides of the bowl with a spatula, as necessary, DO NOT OVER MIX or you can hand mix until well blended.

Using an ice cream scoop divide batter evenly among prepared muffin cups. Bake until toothpick inserted comes out clean or the tops are just dry to the touch, 21 to 24 minutes, DO NOT OVER BAKE. Cool the cupcakes completely before frosting. Scroll down for the frosting recipe.

Click to Watch Candace Nelson's Techniques


Sprinkles Cupcakes' Strawberry Frosting
Ingredients
  • 1/2 cup frozen whole strawberries , thawed
  • 1 cup (2 sticks) unsalted butter , firm and slightly cold
  • Pinch coarse salt
  • 3 1/2 cups confectioners' sugar , sifted
  • 1/2 tsp. pure vanilla extract
Directions
Place strawberries in the bowl of a small food processor; process until pureed. In the bowl of an electric mixer fitted with the paddle attachment, beat together butter and salt on medium speed until light and fluffy. Reduce mixer speed and slowly add confectioners' sugar; beat until well combined. Add vanilla and 3 tablespoons strawberry puree (save any remaining strawberry puree for another use); mix until just blended. Do not overmix, or frosting will incorporate too much air. Frosting consistency should be dense and creamy, like ice cream.
Photo Credit: Cheyenne Kay C.H.M


Saturday, October 1, 2011

PB stew & cookies too ='.'=

October 1st, Saturday, what a great day to hang out with Irenie (she's always super busy & rarely has time to herself, so this is a rare occasion). I've known her since our pre-nursing Junior College days. Lately, she's been craving peanut butter... protein... I suppose. She apparently doesn't eat a lot of meat & maybe her body & baby bump is telling her to eat more PROTEIN. So today, we are making Kare-Kare (oxtail peanut butter stew- a traditional Filipino dish) & since the pressure cooker wasn't working well it took about 2 hours to tenderize the meat VS 30 minutes, so we decided to kill some time and bake PB cookies for dessert.


Both Recipes are as follows:

Kare-Kare

Peanut Butter Cookies, some with Chocolate Chips, some plain-> HK ='.'=


Kare-Kare (adapted from my SIL, Marianne's recipe)

INGREDIENTS


MEAT:
3-4 pounds of oxtail (you can also add tripe & cubes of beef stew meat if you wish)

VEGETABLES (wash these first):
1 large Chinese eggplant cut in small pieces
1 bunch of pechay or baby bok choy or 1/2 head of cabbage (we only used cabbage since her baby daddy only likes cabbage)1 bunch of sitaw
(string beans)


OTHER INGREDIENTS :
2 cups peanut butter (we used 50/50 mix of Lily's Brand & Skippy -Creamy) 
Lily's is sweet, so if you'd rather have more savory than sweet you can use the regular PB
2 packets of Mama Sita's Kare-Kare mix
3 tablespoons cooking oil
1 cup of cold water (plus more as needed)
Patis (fish sauce as needed to taste) OR salt to taste
Knorr beef bouillon cube (dissolved in the reserved stock)
2 tablespoons minced garlic
1 large onion, minced

EAT WITH:
Steamed White Rice
Bagoong (shrimp paste- my favorite is Barrio Fiesta Brand, FYI I am allergic to crustaceans, so I take my chances with just a little bit when I eat kare-kare, it is not the same without it).


EQUIPMENTS:
Large wok or skillet
Pressure cooker or a heavy large pot/sauce pan
Medium mixing bowl

2 Wooden spoons


PROCEDURES:
Wash the oxtails & place in a pressure cooker/heavy saucepan with enough water to cover (add the garlic & onions). When using a pressure cooker, once the steam indicator pops up, cook for about 30 minutes (tender meat that falls off the bone is preferred). If using a regular sauce pan/pot simmer/boil for about 2-3 hours add more water if needed. Once tender and the meat has softened, remove pot from heat and set aside (do not discard the stock).


In the wok heat the cooking oil & stir fry the vegetables. Make sure they are tender before adding the meat (without the stock), continue stirring.

In the mixing bowl, prepare the kare-kare mix by adding the 1 cup water, then add 1/2 cup of stock, mix well. Pour this mixture into the veggie-meat combo and continue to cook for about 10 minutes.

Using the same bowl add the rest of the stock, beef bouillon cube & peanut butter, mix well. Pour this mixture into the veggie-meat-sauce combo. Stir to blend well. Cook for about 5-10 minutes until the sauce thickens. 

Add the fish sauce to taste (this serves as the salty seasoning). Serve hot with bagoong & steamed white rice.


Note: while tenderizing the meat either in the pressure cooker or pot you can add some cloves of garlic & onions OR before pressure cooking the meat, you can sauté it with the garlic/onions/patis for more deliciousness.


AND FOR DESSERT

Peanut Butter Cookies

INGREDIENTS:


  • 1/2 cup creamy peanut butter (We used Skippy)
  • 1/2 cup unsalted butter
  • 3/4 cup granulated sugar
  • 3/4 cup packed brown sugar
  • 1/4 tsp salt
  • 1 tsp baking soda
  • 1 egg
  • 2 1/4 cups all purpose flour
  • Some Hershey's milk chocolate chips (will need about 5-7 chips to top each cookie)


DIRECTIONS:

  1. Preheat oven to 350 degrees F. Line cookie sheets with Silpat. Or you can grease your cookie sheets.
  2. In a medium bowl, cream together the egg, butter, peanut butter, & both sugars until smooth.
  3. In a separate bowl sift together all the dry ingredients. Using a small ice cream scoop or roll into walnut sized balls and place 2 inches apart onto the prepared cookie sheets. Flatten slightly with the tines of a fork. If you wish you can place about 5-7 chocolate chips on the top of each flattened cookie.
  4. Bake for 10 to 12 minutes in the preheated oven. If you are not using a Silpat you can use a spatula to gently lift & nudge the cookies to prevent them from sticking to the cookie sheets. Allow cookies to cool on baking sheet for 5 minutes before devouring.

Hope you enjoy the savory & sweet sides of good old peanut butter, I know we did & Irene's baby was happy too.   ='.'=


Monday, September 26, 2011

El Maggie CHURROS Recipe ='.'=

Bienvenidos!!!

I just came back from "the happiest place on earth" with my Bebesters, Andretti & I just remembered that I forgot to eat a churro. :c

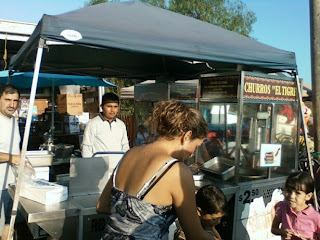
But no worries, I replaced those carbs with two unsalted Mickey Pretzels dipped in nacho cheese & a refreshing Duo Schmoozie (berry smoothie), the chocolatey one is the hubsters. & not eating a churro just reminded me to post my take on the cinnamony-Latin-cylindrical-doughnut-treat. A few months ago, I was chit-chatting with Ate Rianne about how I love Disney's churros but disliked the prices & how Costco churros were not the same. She suggested I look up El Tigre Churro. I found a few YELP ratings about them & how their churro stand was located in the sketchy parts of SD. Ummm, I'm craving them but I don't think I want to get myself killed just to try them. So instead I found a few recipes online and modified them.  Allrecipes has a bunch of rated recipes you can try. But if you'd like to try mine... continue reading...


Deeeeeep fried pastry

Ingredients

For Batter
  • 1 cup water
  • 1 tablespoon white sugar
  • 1/2 teaspoon salt
  • 1 teaspoon ground vanilla bean
  • 1 tablespoon butter
  • 1 cup all-purpose flour
  • 1 teaspoon baking powder
  • 2 quarts vegetable oil for frying
For Cinnamon/sugar topping
  • 1/2 cup white sugar, or to taste
  • 1 teaspoon ground cinnamon

Directions
  1. Mix/sift baking powder & flour together in a bowl, set aside. In a small saucepan over medium heat, combine water, sugar, vanilla bean powder, salt and butter. Bring to a boil and remove from heat. Stir in flour/baking powder until mixture separates from the saucepan and forms a ball.
  2. Heat oil for frying in deep-fryer or deep skillet to 375 degrees F (190 degrees C). Be warned, the batter & oil is HOT... Pipe strips of dough into hot oil using a pastry bag fitted with a large star tip (I used Wilton 1M). Fry until golden; drain on paper towels.
  3. Combine 1/2 cup sugar and cinnamon. Roll drained churros in cinnamon and sugar mixture. They should look like ...


& guess what we found at the Spring Valley Swap-meet? At least we won't have to drive through the ghetto to try them. & you know what??? They taste very similar. & you won't have to pay the extra dollar for the entrance fee.

Monday, September 19, 2011

Tutorial Chocolate French Macarons ='.'=

It's Monday Morning & this is a pictutorial (picture tutorial) for Chocolate Macarons. NOTE:  If you are using regular cocoa powder & not Bellagio Chocolate then you need to change the 1 tablespoon to 3 tablespoons of cocoa & use only 1/2 a cup of Almond Flour.

Ingredients:

Kitchen Tools: AND also need a stand or hand mixer (make sure all are grease free & clean)


PROCEDURE:


Time to PREHEAT THE OVEN to 375 Degrees Fahrenheit


Tap baking sheet to release trapped air bubbles.
LET THIS SIT FOR AT LEAST 15 MINUTES 
in room temp. or Until the tops are dry & have formed a skin.
Reduce the oven temp. to 325 & bake 1 sheet at a time for about 10 to 14 minutes, rotating halfway through. 
The tops of the cookies should resemble an "egg shell" quality. The macarons should be crisp and firm. Let it sit to cool about 2-3 minutes before removing.  
Make sure to increase the temp. to 375 to preheat & repeat the baking process for the rest of the macarons.


Sandwich 2 same size macaron with about 1 tsp. filling: Peanut butter, Nutella, Chocolate Butter Cream, Dobrova, or whatever you are craving.


As always, I just can't leave a plain 'ol Macaron alone... ALOHA KITTY!!! She's tanned & wearing a flower instead of a bow.  ='.'=


This post is dedicated to my dear friend, Ate CeCe, she loves Hello Kitty & one day she will get to taste one of my chocolate HK creations. 


Without Christ I am nothing. 

Saturday, September 17, 2011

Easy Parisian FRENCH Macarons ='.'=

It's Friday- finally! How has everyone been? I missed you!

Let's bake some YUMMMMY French Macarons, but first, you should read what it is by clicking the link Definition of Macaron or check out the pictures after the recipe.

I tried baking chocolate macarons in 2008, they were yummy but not pretty (I don't want to scare you away so you'll have to read this first before you see those photos).

& if it weren't for my pastry guru, Ate Rianne AKA ArtOfDessert

I would be missing out. She bought me my very first box of rainbow delights from  Opera Patisserie San Diego. 

It was love at first bite. Ever since then I've been hooked and have been Internet studying on how to bake it. Imagine!!! I was able to transform Almond flour, egg whites, & sugar into confectionery bliss. WARNING! Learning how to bake these bite sized confectioneries is very BAD, gluttony I'd say, because, instead of enjoying just one, you might just eat them all & not want to share with anyone. So also add greed to one of those sins you have or will commit, not to mention vanity, since they are so very pretty- LOL.
Anyways, this time around I used Martha Stewart's recipe & tinted the basic batter pink (so cute) & added strawberry extract. There are other recipes that call for boiling sugar syrup and or letting them sit for 2 hours. Who has the time??? Now go shopping & start baking.

From Martha Stewart's Recipes:

Ingredients

  • For the Macarons

    • 1 cup confectioners' sugar
    • 3/4 cup almond flour
    • 2 large egg whites, room temperature
    • Pinch of cream of tartar
    • 1/4 cup superfine sugar
Directions
  1. Pulse confectioners' sugar and almond flour in a food processor until combined. Sift mixture 2 times.
  2. Preheat oven to 375 degrees. Whisk whites with a mixer on medium speed until foamy. Add cream of tartar, and whisk until soft peaks form. Reduce speed to low, then add superfine sugar. Increase speed to high, and whisk until stiff peaks form, about 8 minutes. Sift flour mixture over whites, and fold until mixture is smooth and shiny.
  3. Transfer batter to a pastry bag fitted with a 1/2-inch plain round tip, and pipe 3/4-inch rounds 1 inch apart on parchment-lined baking sheets, dragging pastry tip to the side of rounds rather than forming peaks. Tap bottom of each sheet on work surface to release trapped air. Let stand at room temperature for 15 minutes. Reduce oven temperature to 325 degrees. Bake 1 sheet at a time, rotating halfway through, until macarons are crisp and firm, about 10 minutes. After each batch, increase oven temperature to 375 degrees, heat for 5 minutes, then reduce to 325 degrees.
  4. Let macarons cool on sheets for 2 to 3 minutes, then transfer to a wire rack. (If macarons stick, spray water underneath parchment on hot sheet. The steam will help release macarons.)
  5. Sandwich 2 same-size macarons with 1 teaspoon filling. Serve immediately, or stack between layers of parchment, wrap in plastic, and freeze for up to 3 months.


  • Suggested Fillings for Macarons


  • My very first attempt... I'm not a very patient person, and although I wanted them to be perfectly round, I did not know how to use a piping bag very well. Over time, I was able to acquire some decorating skills & can now properly handle piping bags & learned a few tricks along the way.


    Baked these Strawberry ones on 09/13/11, the Strawberry preserves was great but too sweet for me & they oozed out of the macarons & made your hands pretty sticky.


    Then I couldn't stop baking them... so for 3 days straight... I made some more... so many that I think my teeth hurts just by looking at them.


    Flavors from top to bottom & left to right:
    Buko-taro, Taro-taro, Bellagio chocolate-chocolate, Mango-mango, & Lychee-mango
    I will continue to experiment with flavors and hopefully the little feet will form on those buns. Just like this batch:


    & of course I couldn't resist... so I made Hello Kitty ones too <3


    ALOHA KITTY (Bellagio Chocolate & Dobrova)
                                       Click & learn: Easy Chocolate Macarons

    Photo credit: Rianne (Art Of Dessert)

     
    & since my SIL, Annalou's birthday is on Sept. 18th, I decided to spruce up her cakes with them.


    I will try to post a video, as soon as I learn how to do that. :D Have a great & safe weekend!  Good MorNight!

    Saturday, September 10, 2011

    Rachel's Angry Birds ='.'=

    Good MorNight!

    My God-daughter, Miss Rachel turned 16 this August & I have not seen her like since forever. & I heard she would be in town for her surprise birthday party.

    So I asked her mom what kinds of things would she like for her birthday. Whoo-hoo! As fate would have it, she has not ordered a cake yet. Although I've been very busy with "life", how could I resist this privilege. I've been MIA with most of my GD's life that I am super honored to bake & create something for her. According to the mom (Ate Rhizza) & her auntie (Ate Cyndi), Rachel doesn't like pink or Sanrio characters & that her favorite color is blue & loves chocolate. WHAT!?! So I pondered for a while and remembered that she "liked" my Angry Bird sugar cookies that I posted on FB. I decided to make her what I thought would be a great idea. Create a Rachel bird & use that for the cake.


    When I had asked the hubby, what he thought of the sketch, he thought it looked great, but I wasn't happy with it at all. So I just started to play with fondant. & the 1st cake looked like this:


    Then when I placed it in the fridge, the fondant & whipped cream frosting got ANGRY with one another & it bled&pooled&uglied together. The Rachel bird- didn't look angry at all, she looked scared & almost timid.


    So the following day, I woke up super early to bake another cake. But first, here is a picture of the many pigs, that hubby requested I make.


    & the final cake. It wouldn't be complete without Hello Kitty & a Pink Balloon to show my God-Daughter that HK/Sanrio & Pink is super cute, & I love to incorporate that into almost everything I make.


    I know, I didn't learn my lesson with this cake, as you will see in the following pictures (Re: the fondant & whipped cream frosting combo).  So, I waited till the very last minute to put on the fondant deco, before delivering the cake in hopes that it could survive the party.


    Not only did the fondant melt, but apparently the cake shifted in the box too.  :C


    See that GORGEOUS smile!!!


    Mission accomplished, my GD loved it! ==> My heart is super happy! :D

     & again I say Good MorNight!  ='.'=